For many hobbyists and DIY enthusiasts working with wet wood proves to be a great challenge.
While you might want to avoid it at all costs, you can end up in a situation where you find yourself dealing with wet wood.
I remember when I was having a new house built, and it had been raining for a week. To minimize and eliminate any damage, I did a little research, and here’s what I found to keep the wet wood in good condition.
So can you drill into wet wood? Yes, you can drill into wet wood. However, the wood will contract after it drys out, so you will have to consider making the hole larger or smaller depending upon your use case. The contractions can propagate cracks if you are planning to install a wooden dowel after drilling the wet wood.
Building with wet wood is not recommended as wood shrinks once it dries, which can lead to warping, cracking, and in some cases rotting. Splitting wet wood is often preferred by many professionals depending on the type of wood. It is much easier to carve wet wood, and it is frequently used in carving projects.
If you are curious about wet wood, this article will provide you with all the necessary information for working with wet wood and situations in which you might want to avoid it.
Types of Wet Wood:
Green-Wood:
Freshly cut wood is referred to as greenwood.
The moisture content of greenwood is very high, and it is dried using different techniques to lower its moisture content to optimum levels. When green wood goes through air-drying or kiln drying to get optimum moisture levels, it then becomes seasoned wood.
Green-wood can contain up to twice its actual weight in moisture content. So it poses problems both in terms of its weight and high susceptibility to rotting.
The moisture content in greenwood is so high that it is nowhere near ready to be used for woodworking.
Wet Wood due to Environment:
Since wood is a hygroscopic material, it never stops absorbing and releasing moisture into its environment until it is completely sealed.
Seasoned wood can easily turn into wet wood if it is not stored properly. You might think that getting rained on is the only reason for seasoned wood to get wet, but it can easily happen even indoors if the environment’s moisture content is high.
Maintaining an appropriate moisture content is very important for storing wood properly.
Working with Wet Wood:
Working with wet wood is mostly discouraged as it can potentially lead to several problems as the wood dries and changes dimensions.
While building with wet wood is not a good idea, in some cases working with wet wood is actually preferred.
I have listed down situations where you should consider using wet wood and the reasons for it.
Splitting Wet Wood:
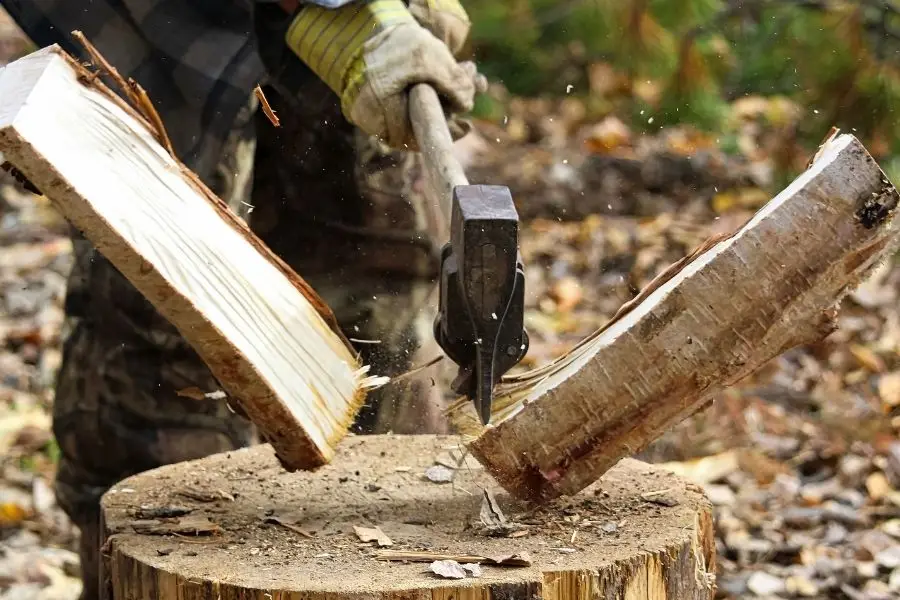
You might be curious as to why splitting wet wood is a good idea when in general, working with wet wood is discouraged.
Splitting wet wood is easier in the case of hardwoods like maple and oak. Another reason is that splitting wet wood can significantly speed up the drying process and prevent rotting.
Tools:
Use a wood splitter’s maul instead of an ax. The wedge shape of a maul allows it to split wood without getting stuck.
Steps for Hand Splitting Wet Wood:
- Start by cutting the fallen tree into rounds of manageable size.
- Inspect the round for weak areas to target while splitting.
- Place the round on a chopping block if available otherwise on hard ground.
- Stand next to the chopping block.
- Raise the maul over your head and engage your entire body.
- Look at the exact spot you want to hit and aim for it.
- Focus on splitting the wood all the way to the bottom and hit it.
- Once you are done, stack the wood for drying.
If you are dealing with conifer woods that are way too soft when wet, you should split them once dried.
Carving Wet Wood:
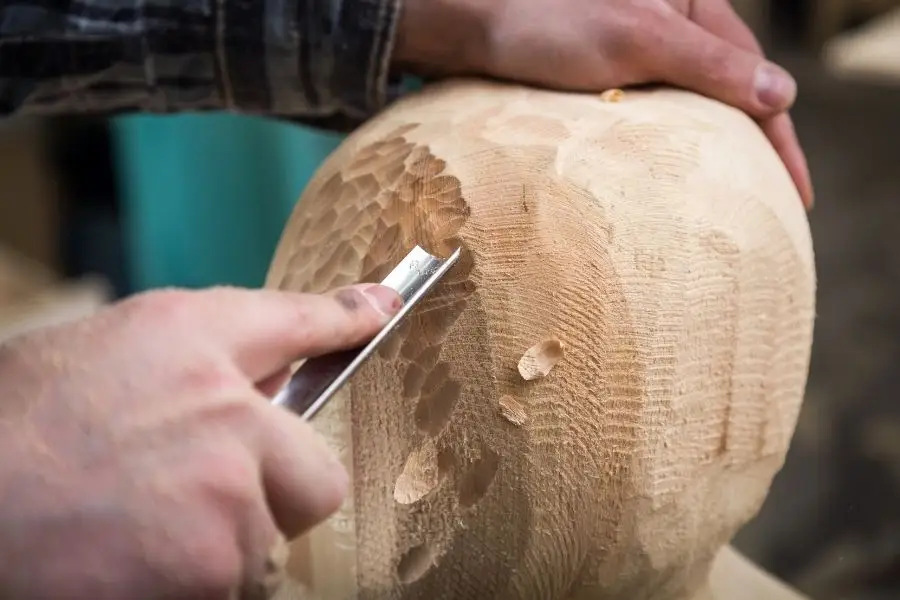
Carving wet wood is relatively easier as compared to seasoned wood which is why often green-wood is carved.
In some cases, when wet wood is not available, it is a common practice to soak the wood for softening it.
Since the moisture is evenly distributed from the inner rings to the outer rings, carving green-wood offers a more consistent carving experience with no need for moisture application.
Once you have finished carving, you need to dry the wood completely.
Green-wood can take up to 6-8 weeks for drying completely. If you have applied moisture to your wood, you should wait 1-2 days for it to dry.
Presurfacing Oak Wood:
In literature, presurfacing is the process of planing green oak wood to reduce its air-drying time. Research suggests that oak wood planed on both sides has much less drying time as compared to rough oak wood.
Although this technique is not widely practiced, it is in fact used by several companies in the industry,
So if you are using green oak wood for a project you should consider presurfacing your wood to dry it up quicker.
Challenges of working with wet wood
- If you build with wet wood, it will shrink in all dimensions as it begins to dry out, causing cracks and wraps.
- Using tools like a saw, sander, or jointer on wet wood may damage your tools. It can cause rust inside their metal parts, thus reducing their life span.
- If you are working with wet wood, you can end up damaging it as it is soft.
- If you are using adhesives for the joints, shrinkage can put the joints at risk.
Measuring moisture level:
The moisture level should be 6% to 8%for interior and 10% to 15% for exterior wood.
The easiest and most effective method to measure wood’s moisture level is to use a Moisture meter.
Moisture Meter Testing
There are two common types of moisture meters:
Pin-type Wood Moisture Meters:
Pin-type meters are used by penetrating electrodes and using electrical resistance.
Mainly, water contains electricity, and wood doesn’t, so that the dryness can be determined by the level of resistance to an electrical current. Dry wood has less resistance as compared to wet wood.
Pinless Wood Moisture Meters:
A Pinless meter is used through non-penetrating and measures moisture content by reading a non-damaging electromagnetic sensor.
Pinless meter covers a larger area than pin type meters and scans the wood surface; it provides a bigger picture of its moisture level.
It is a perfect tool to measure the hardwood floor’s moisture as it doesn’t leave damaging pinholes on the wood’s surface.
Best products To Check Moisture Level From The Wet Wood
If you are working with wet wood, you need to constantly monitor the moisture levels of your wood. I have listed down the best and most well-known tools for testing moisture level:
1. Extech MO210 Pocket Size Moisture Meter
The Extech MO210 Pocket Size Moisture Meter (Check on Amazon) is specifically designed to check the wood’s moisture level. It’s in a pin-style meter that can be replaced, having useful features, including automatic temperature adjustment and a built-in calibration check.
However, It cannot provide a reading if the Moisture content (MC) is less than 8%.
2. General MMD7NP
The MMD7NP (Check on Amazon) pinless moisture meter by General Tools allows you to determine the moisture content of softwood, hardwood, and other building materials. It can detect moisture levels up to 3/4 inches deep.
It has a measurement range of 0 to 53% for softwood and 0 to 35% for hardwood.
Frequently Asked Questions:
Is wood ruined if it gets wet?
If wood is exposed to high moisture levels for an extended period of time, it can rot. It is, however, quite easy to dry wet wood, so not all wet wood is a lost cause.
Is wet wood harder To cut?
You might be surprised to know, but wet wood is much easier to cut than dry wood. Moisture content in wet wood acts as a lubricant and hence reduces friction for the chainsaw.
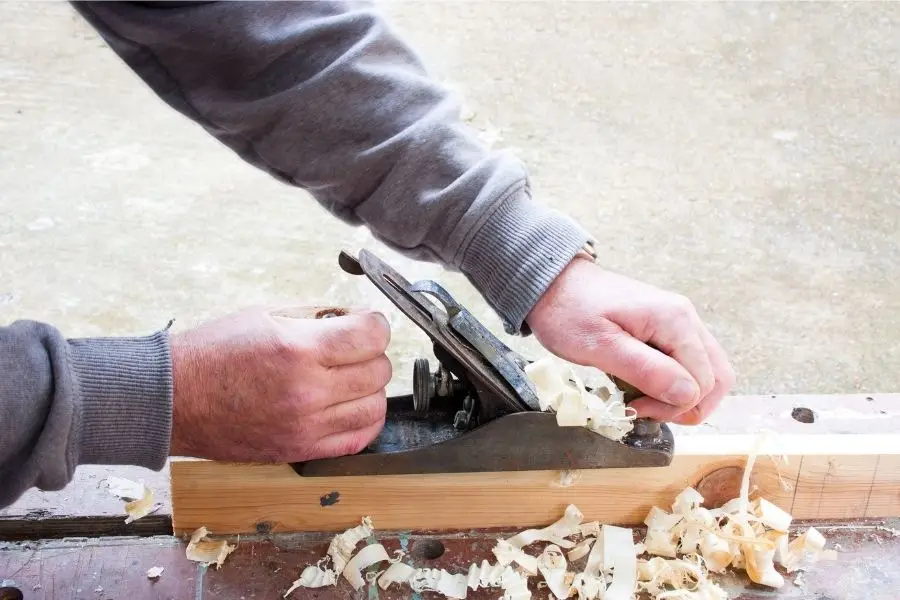
Can you plane wet wood?
Yes, you can plane wet wood, and in some cases, people claim that planing wet wood gives a much better finish. You should make sure to completely wipe any moisture left on the planer to avoid rust.
Can I screw into wet wood?
It is not recommended to screw into wet wood as it is softer, and the screws may not make the necessary markings. Screwing into wet wood can also damage it as you try to tighten the screw.
