Although glass insulators in electric wiring are obsolete these days, people still love to use them in a DIY project. Glass insulators are among the sturdy objects that you can find to drill in. Drilling glass insulators can be difficult but not unattainable.
How to Drill Glass Insulators? To drill glass insulators, make putty out of flour, then circle the putty around the glass insulator’s edge, pour water or an easily available coolant inside the putty, and select an appropriate sized diamond or carbide drill bit. Using a drill press or simple drill, drill into the glass center and polish the edges with sandpaper.
Using the right tools and expertise, you can change the face of a glass insulator. I have experimented with some stuff recently and wanted to share my personal experience with you so that you can drill right into glass insulators like a pro but before jumping into it, let me tell you pretty decent ideas about where to use them in your DIY project.
DIY Uses of Glass Insulators
Thanks to the glass insulator’s multi shades, they can be used in many delicate decorating projects. The color scheme range from transparent all the way to red-black. Not only do the insulators offer a range of colors, but they also have multiple shapes. Let’s jump straight into what they can be transformed into:
- An outdoor transparent lantern.
- A nice indoor candle holder.
- Your dining table showpiece.
- A flashy toy for your kid.
- Salt or Pepper holder
- Suncatcher

Methods to Drill glass Insulators
Glass insulators are thick pieces of tough glass that are slippery and sturdy at the same time. They do not easily crack, but using the wrong methods to drill can crack them. Glass insulators can be drilled using two methods
1) Using a Drill Press 2) Using a Cordless drill.
You can also drill it with a Dremel which is quite difficult, but still doable. Check this article on how to drill into sea glass to learn about the Dremel method.
A. Using a Drill Press to Drill Glass Insulators
A drill press is way more powerful than a cordless drill. Due to its large size, it has a greater mechanical advantage. Besides this, the drill press also comes with a resting table that usually clamps the object, making drilling easier. But before we discuss the method, let’s list the items needed for the procedure.
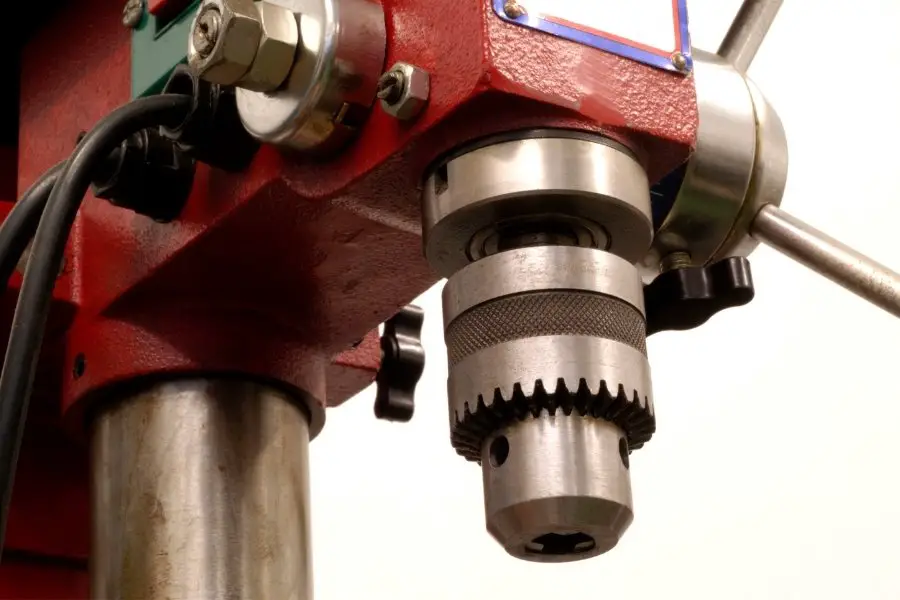
- Drill Press
- Putty
- Water or turpentine
- Diamond or Tungsten carbide drill bits
- Safety goggles and gloves
1. Making a Putty with Flour
Putty can be made using plain flour and water. For this purpose, take a cup of flour and add 1/3rd cup of water into it. Mix it with the help of a spoon and add a tablespoon of vegetable oil. Stir it generously till there are no remains of dry flour. Add coloring agent if needed, but for this purpose, I don’t recommend it. The putty should not be too slimy because then it will stick to the surface.
2. Selecting appropriate Drill Bit
For Drilling into glass insulators, I recommend only using diamond-tipped drill bits. This is because they are more resilient and efficient at drilling holes into the glass. Try to start with a small diameter bit and then later jump to the larger one. I will recommend my personal favorite
- Baban 10Pcs Hole Saw Diamond Drill Bit
- Norske Vacuum Brazed Diamond Drill Bit
Former is a pack of 10 pieces and each is made of everlasting highly resilient steel while the later is a single piece of highly affordable bit.
3. Adjusting Drill Speed
The drilling speed (RPM) should be kept low to drill glass insulators because excessive speed will overheat the glass and possibly crack it (excessive heat can also damage the diamond coating). Ideally, the spin should not exceed 1150 revolutions per minute.
4. Safety Protocols
It includes wearing standardized gloves and safety goggles and keeping a keen eye on the working hands.
6. Clamping the Glass Insulator to the Resting Table
It is always recommended for a 90 degrees accurate angle to clamp the glass insulator to the resting table. It also makes the procedure quite easy. Before clamping, make sure to mark the center accurately with a permanent marker.
7. Encircling the Putty onto the Glass Insulator
Place the putty around the edges of the insulator and make sure to remove any possible leaks. The putty walls should be large enough to accommodate at least half a cup of water. Now pour cold water or turpentine inside the putty.
8. Drilling
Now slowly move the drill bit towards the center of the glass insulator and move inward. It usually requires patience and multiple attempts to drill a complete hole. Keep pouring water intermittently to keep the bit cold.
9. Polishing the Edges
For better aesthetics polish the edges of the glass insulator with a fine grit sandpaper
B. Using Cordless Drill to Drill Glass Insulators
Everybody can’t afford the luxury of a drill press. Besides the expense, it isn’t easy to move it around and is not an ideal DIY enthusiast tool. On the other hand, cordless drills offer high power, excellent portability, and low expense at the same time. To drill glass insulators we will need:

- Cordless drill
- Wooden jig
- Iron Clamp
- Putty
- Water
- Diamond or tungsten carbide drill bits
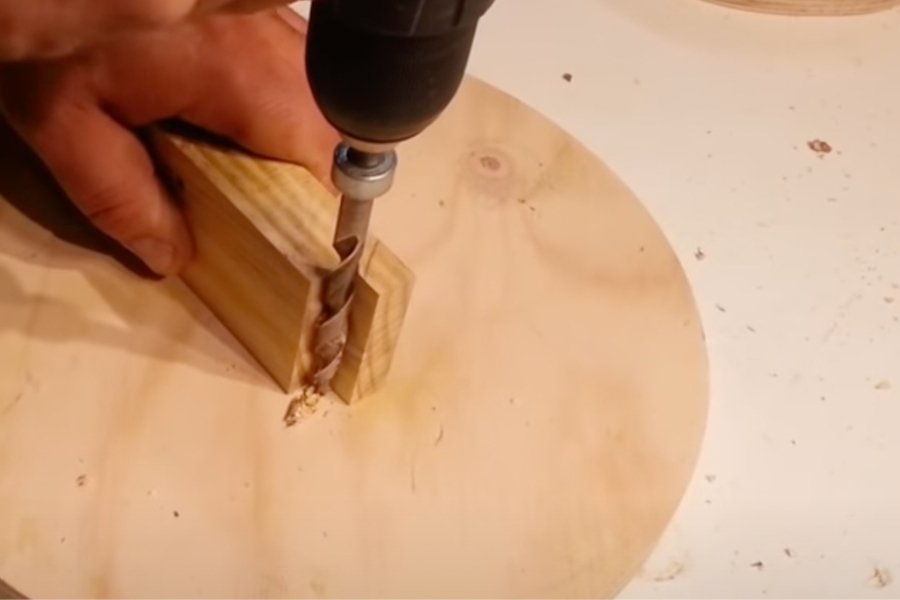
Making a 90 Angle Wooden Jig
To drill straight at 90 degrees into the glass insulator, I prefer a wooden jig. This not only has an accurate angle but also supports the drill bit in place. To make one, cut a rectangular piece of wood with smooth surfaces. Using a saw make a 90 degree grove at wood end as shown in picture below.
Procedure
Drilling with the help of a cordless drill is not much different than using a drill press, but we face few shortcomings like poor stability, drilling through a wrong angle, and overheating. I will try to discuss the ways to overcome them.
- Make a putty out of flour as mentioned above.
- Wear safety goggles and gloves.
- Select appropriate sized drill bit (Prefer using a diamond drill bit and starting with a small diameter).
- Fix the glass insulator into the iron clamp.
- Mark the center with a permanent marker.
- Circle the putty around the edge and pour cold water.
- Now using the wooden jig, drill into the glass insulator. Don’t forget to take periodic breaks ( this will prevent the bit from overheating).
- Once you are done with the hole, polish the edges with sandpaper.
Using Tungsten Carbide Drill Bits
I don’t prefer using carbide drill bits because they often crack the glass and leave a bad impression on the insulator. If you are into trying a carbide drill bit, prefer using “Yufutol Carbide Burr Set” because it has double grooves that work better than single grooved bits.
Precautions to Prevent Glass Insulator Breakage
Glass Insulators are hardcore objects that are not easy to break but some times when drilling is carried out recklessly it can chip or crack the glass leaving a bad impression. I have compiled a list of precautions that will help you prevent this,
- Refrain from using hammer drill at any cost because the bursts shatter the glass.
- Use diamond tipped drill bits
- Never apply pressure when drilling glass insulators
- Use a clamp to hold the glass insulator properly, this helps to drill precisely.
- Prefer drilling at slow speeds.
What drill bit goes through glass?
Two types of drill bits goes through glass 1) Diamond drill bits 2) Tungsten Carbide drill bits. Diamond drill bits are more superior to carbide-tipped bits.
Can you drill a hole in tempered glass?
No! tempered glass will shatter upon drilling. To drill a hole in the tempered glass, either use a torch or drill before the glass is tempered.
Are glass insulators worth anything?
Yes! they are considered antiques nowadays and are pretty popular among collectors and DIY enthusiasts. They can range from “4 USD” all the way to “500 USD” depending upon the color, shape, and quality.
